7 Holiday DIYs for Your Pets
As the holiday season approaches, gift shopping is either at the top of your list of priorities or somewhere towards the bottom. Either way, as a pet parent you will likely still want to spoil all the furry friends in your life. We want them to feel just as loved and cherished as the rest of the family this season, but we know that gift prices can really rack up over time especially as you begin to buy for friends, family, coworkers, etc. With that being said, here are some fairly simple pet DIYs that won’t break the bank!

DIY 1: Personalized Pet Ornaments
What better way than to start out some festive DIY gifts than with something a little more personable? Heathered Nest has a nice extensive lift of the 71 Best Dog Ornaments (plus ten DIY options). Decorating the Christmas tree with personalized pet ornaments is such an adorable way to show your favorite four-legged friend(s) that you love them. This specific idea is inspired by Canadian Living’s Dog Bone Holiday Ornament. (Beware: Using our treats may be tempting for your furry friend, but remember this DIY is for decorative purposes only.)
Supplies
- 10 Earthborn Holistic baked dog treats (approximately)
- Black cardstock
- 4 popsicle sticks
- Mod Podge
- 5.5 x 5.5 inch photo of your pet
- Paw print ribbon (cute, recommended) or any color ribbon
- Glue
- Scissors
- Paintbrush (if using mod podge)
Directions
- Cut out a piece of black cardstock with 5.5 x 5.5 inch dimensions.
- Cut the center of the cardstock to begin creating the frame. Measure a 5 x 5 inch inner frame on the cardstock. Then, you will have a picture frame of 5.5 x 5.5 inches with a ½ inch width.
- Glue and apply popsicle sticks to each of the four sides. This will help to give the frame extra support.
- Glue Earthborn Holistic oven-baked dog treats to the front sides of the ornament.
- Use Mod Podge to seal treats and give them a shiny finish. Let dry completely.
- Place glue on each corner and stick on the photo from the back of the ornament.
- Cut out another piece of cardstock, 5.5 x 5.5 inches in size. Glue it on the back of the ornament to finish it off.
- Create a cute bow with the ribbon and attach to the back of the ornament. There you have it! A fun festive way to incorporate your pet into your Christmas decorations for years to come.
DIY 2: Wood Pet Photo Ornaments
While we’re on the topic of ornaments, this tried and true ornament craft is great if your dog will be a little too tempted if you start putting tasty treats on your Christmas tree and it even works for cats, too!
Supplies
- Wood slab ornaments
- Small circular photo of your dog or cat
- String
- Mod podge
- Needle
- Scissors
- Blade
Directions
- Cut out a photo of your pet small enough that it will fit onto the wood slab.
- Put a thin layer of mod podge onto the wood.
- Place the photo of your pet on top of the mod podge. Use a blade to smooth out any air bubbles and then let it sit for a few minutes to dry.
- Put another thin layer of mod podge on top of the photo. It will leave a white layer–this is normal!
- After it’s dried for a few minutes, use your blade to lightly scrape off the excess Mod podge.
- Use your needle to thread a piece of string through the hole (you’ll need to poke through the photo), cut, and tie!
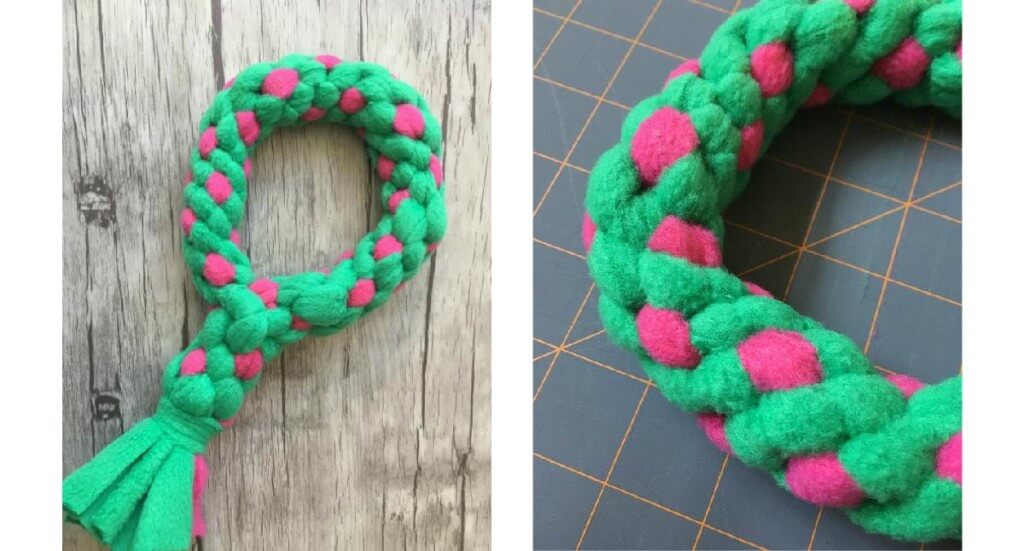
DIY 3: Christmas Dog Treat Wreath
Sort of like an ornament, but a little bigger… Let’s make a DIY Christmas dog treat wreath! This craft is simple and adorable. Also, what kind of dog wouldn’t appreciate a wreath of tasty Earthborn Holistic dog treats?!
Supplies
- Earthborn Holistic EarthBites Chewy and/or Baked Dog Treats
- Christmas ribbon (1-2 colors)
- Cardboard
- Green paint
Directions
- Cut cardboard into the shape of a wreath for the base. Upstate Ramblings recommends tracing around a dinner plate, then a bowl for the inner circle.
- Once you have your wreath base, you can proceed to use green paint because parts of the cardboard will be peeking through.
- Then, tie red ribbon to the cardboard and wrap it around the treats to keep them in place on the base of the wreath.
- After you read the end of the circle, tie the ribbon underneath. Tie an additional green bow to the bottom of the wreath for an extra touch!
DIY 4: Doggie Advent Calendar
Dogs and the holidays can be quite the combo, so why not make a fun countdown for them to get you both pumped up for Christmas? If you got a little more time on your hands, this is a great holiday DIY to tackle. A “Doggie Advent Calendar” would be a fun tradition to start with your pups – this way you can reward them daily with their favorite snacks during the holiday season!

Supplies
- 14 x 14 inch cork board
- 6 inches of red burlap ribbon
- (1) 6.5 inch wooden wooden circle
- (1) 5.5 x 3.5 inch wooden oval
- (2) 4.5 x 3 inch wooden ovals
- (2) 2.75 inch wooden circles
- 24 miniature felt stockings
- Gold ribbon wire
- White puff paint
- Assorted snowflake charms
- Acrylic paint in white, black, brown, and red
- Hot glue
- Thumb tacks
Directions
- Cut 24 pieces of 3.5 x 6 inch burlap ribbon pieces for little red pouches.
- Fold each of the burlap ribbon pieces in half (finished edges facing upward) and sew a ¼ inch seam in each side.
- Turn the pouches inside out, then you will have 24 little burlap sacks!
- The miniature felt stockings will be placed on each sack to mark the calendar days.
- Label the miniature felt stocks with white puff paint to write the numbers 1-24 on each stocking. Let these thoroughly dry.
- Cut two strands of gold ribbon wire about 10 inches long. With a tapestry needle – starting from the center of the front of the bag about ¼ inch from the top – use a long basting stitch to thread the gold ribbon wire through the top of the sack, ending at the front. This will create a drawstring to close the sacks.
- Gather wooden pieces and the cork board. Assemble the wooden pieces as shown at the top of the cork board and hot glue into place.
- Add a dot of hot glue to the front of each bag and glue on one of the numbered stockings. (Optional: Glue on a few snowflakes for a little decoration!)
- Place treats in the burlap sack and tie it shut (gather the top with a tied bow). Then, thumbtack each individual bag in place onto the cork board as shown.
- To paint the dog, begin with a base coat of white. While the white is still wet, add a touch of red for the cheeks and blend in. Add a touch of black to shade the paws and muzzle, then blend in. Use black to outline the paws.
- Once the white is dry, use black to paint in the ears, head and nose.
- Use black to draw in the smile, and dots on the cheeks. Use red to paint on the tongue. Paint in two white ovals for the eyes as shown above. Once they are dry, use the brown to paint in the eyes.
- Final touches include outlining the eyes and tongue in black, adding in the pupils in black and adding white highlights on the nose and eyes. Assemble the board accordingly and there you have it – the countdown to Christmas is on!
DIY 5: Dog Christmas Wreath Pull Toy
Since the previous DIYs have all involved treats, let’s switch things up. Most pups love being active and of course a good game of fetch! This Dog Christmas Wreath Pull Toy is a little more complicated, nevertheless, super cute and festive.
Supplies
- 1 strip of red fleece, 3 x 60 inches
- 3 strips of green fleece, 3 x 60 inches
- Scissors or rotary cutter
Directions
- Begin by cutting out your strips of fleece.
- Gather the pieces together and tie a simple knot in the top of the fleece strips. Leave about 2 inches of fleece above the knot.
- Sort the strips of felts – starting by laying one strip up.
- Then lay each of the strips to the sides and bottom, creating a cross.
- Fold the top strip down and to the right. (It’s important to do this sequence in the correct order!!!)
- Fold the bottom strip up and to the left.
- Weave the right strip over and under the other strips. Now you have two strips on the left side. Rest the strip from the right, below the strip that was originally on the left.
- Finally, weave the piece on the left over and under the other strip. Now you have a “square” of folded strips and the tails of the fleece pieces make a cross again.
- Now it’s time to pull and tighten the woven fleece. Pull on the ends of fleece. At first, pull gently so you don’t unfold the folds.
- Pull the fleece tightly. Repeat the steps until you have about 10 inches of box woven fleece.
- To make the wreath shape you need to untie the original knot that is at the top of the fleece strips. Make an arch and bring the two ends together.
- Match up the colors of fleece into pairs, making 4 pairs. Tie a single knot into the two pieces that are at the back of the wreath (this helps hold the circle together when starting to weave).
- Once again, create a cross with the strips of fleece (this time working with the pairs).
- Follow the exact same box weaving steps. As you pull them tight, you will see that you have plenty of fleece available. Weave for about 2 inches, to make the pull toy handle.
- Tie a knot on the end of the strips of fleece. Now, your wreath is done and ready to be played with – merry fetching!
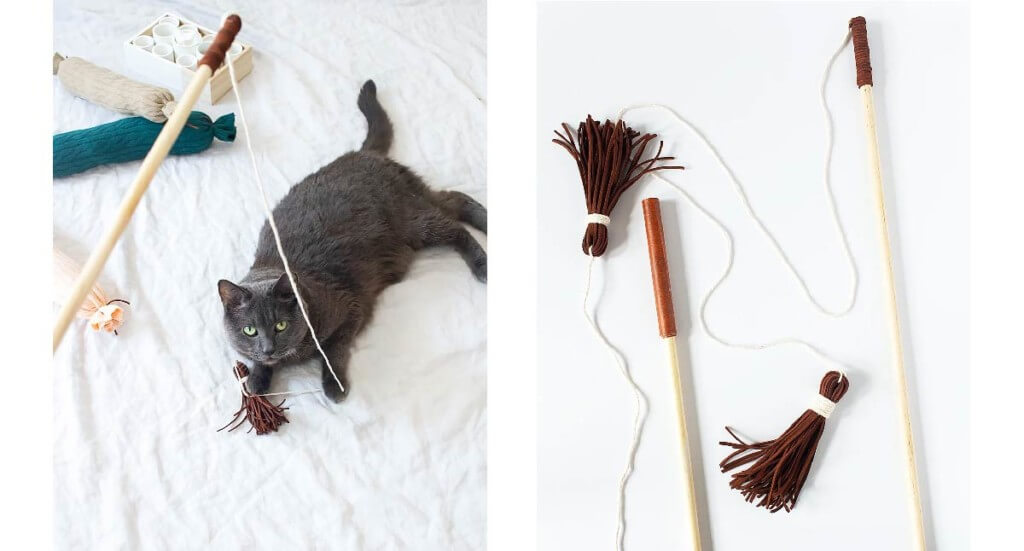
DIY 6: Cat Ribbon Wand
Don’t worry, feline friends! We found a DIY for you too – a fun DIY modern cat wand toy (with wood and leather). This one is perfect for active cats and kittens that love to play.
Supplies
- Wooden dowel
- Leather lace
- Faux or real leather fabric
- Cotton twine
- Scissors
- E6000 or other clear strong glue
Directions
- Cut a piece of faux leather fabric about the width of your hand. This will make the “grip.” Wrap the fabric around one end of the dowel and secure it with glue. Wrap the fabric tightly around the dowel, and apply a line of glue every few turns.
TIP: Clothespins or binder clips can help hold the fabric in place while you allow the glue to dry for a few minutes before continuing.
- When the faux leather grip has dried, flip the dowel over so you are working with the other end. Cut off a piece of cotton string a little longer than two feet, and glue one end of the string to the dowel.
- Now cut an 8″ length of faux leather lace to wrap this end of the dowel. Glue the end of the lace to the dowel, then wrap the cord tightly and evenly around the dowel, applying more glue every few turns. Trim the end of the lace and hold in place with another dab of glue.
- Next, make the tassel toy. Find an object that is approximately the length of the final tassels.
- Place the end of the cotton string on the object, with a tail of about 4″. This will be used to attach the tassel to the wand.
- Wrap the leather lace around the object roughly 20 times. More will make a fluffier tassel, less will make a thinner tassel.
- Tightly tie the end of the cotton string around the lace threads with a double knot.
- Turn over the object, and cut through the lace threads right in the middle.
- Gather all the tassel pieces so they are hanging down in the same direction. Then tie tightly with another piece of cotton string.
- Finish the toy by wrapping the string around the tassel several times. Tuck the end under the loops, and secure with a dot of glue. (P.S. We recommend festive colors, such as green or red, to get in the holiday spirit!)
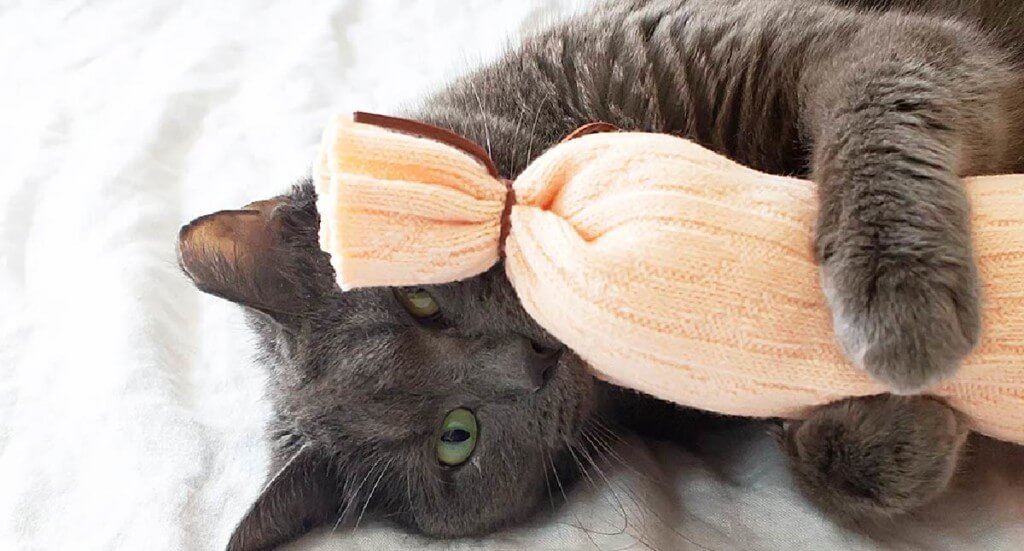
DIY 7: Holiday Catnip Toy
Now, this is such a simple but festive DIY cat toy that any cat is sure to enjoy! This just requires four simple steps and can be easily switched out for each season. Not to mention, this is a great way to use old socks that may be too worn to wear anymore.
Supplies
- Knee-length socks
- Catnip
- Fiber fill
- Scissors
- Faux leather lace or other cord
- E6000 or other clear strong glue
Directions
- Cut the foot off of a knee-length sock, and part of the cuff if necessary (final toy should be slightly shorter than the length of your cat’s body).
- Tightly tie off one end of the sock with a double knot. For extra security, add a small dab of E6000 to the underside of the knot.
- Stuff the sock with fiber fill and catnip (easiest way to distribute the catnip evenly throughout the sock is to spread out a bunch of fiber fill and sprinkle catnip on top of it). Then, push the fiber fill bunch into the sock. Continue until the sock is completely stuffed. TIP: Be generous with the catnip — you want your cat to smell it through all the fabric. Dried catnip will lose some potency out of its sealed container.
- To finish the homemade catnip sock, tie off the end as before, and add a dab of glue under the knot. Your cat will love this new, expensive toy – and you’ll be able to use things you likely already have. Win-win!
December means the season of giving – don’t forget to show your pets some extra love this season. These DIYs are fun, personable, *affordable* options to create! Now you are ready to give them something that they are sure to love and appreciate. Let us know if you make any by tagging us on social media. Happy Holidays from all of us at Earthborn Holistic!